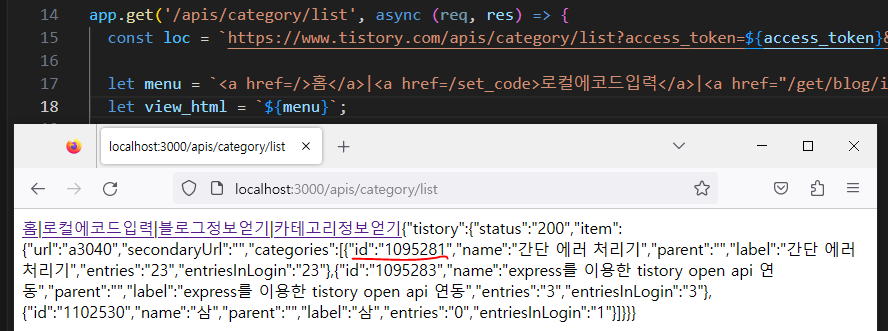
저번글에서 소개 · GitBook (tistory.github.io) 를 이용해서 code,access_token을 얻고 이 토큰을 이용해서 axios를 이용해서 get 방식으로 블로그 정보와 카테고리 정보를 얻어오는 방법을 작성했습니다.
이번 글에서는 토큰과 글 작성 · GitBook (tistory.github.io) 를 이용해서 post 방식으로 블로그 글 작성을 진행해 보도록 하겠습니다.
오픈 API 가이드 글작성에 필요한 파라미터들입니다.
작성 테스트를 진행하던 중 무슨 파라미터인가 알기 가장 어려웠던게 category 파라미터였습니다. 몇 번 테스트 해본 결과
category 파라미터는 get방식에서 작업했던 카테고리 · GitBook (tistory.github.io)에서 얻어온 id값이었습니다.
- blogName: Blog Name (필수) title: 글 제목 (필수) content: 글 내용 visibility: 발행상태 (0: 비공개 - 기본값, 1: 보호, 3: 발행)
- category: 카테고리 아이디 (기본값: 0)
나머지는 특이사항이 없었던 듯하고 가이드의 설명을 보면서 파라미터 값을 변경하시고 테스트해보면 바로 확인이 가능했습니다.블로그 내용 작성 폼은 만들지 않고 바로 post 방식으로 진행하겠습니다.
category는 저번 글에서 얻어온 "1102530" 를 사용합니다.
가이드의 파라미터형을 axios에서 사용하기 편하도록 변경했습니다. 나열해서 기존 get방식 Url방식으로 사용하셔도 동자합니다. 메뉴는 공통부분을 통일해서 전역변수로 옮겼습니다. axios get과 데이터를 주고 받는 방식은 동일하고 axios.post 방식으로 바뀌었고 파라미터 유형이 많아져서, dict 방식으로 파라미터 전송방식을 변경했습니다.
추가코드
const menu = `<a href=/>홈</a>|<a href=/set_code>로컬에코드입력</a>
|<a href="/get/blog/info">블로그정보얻기</a>
|<a href="/apis/category/list">카테고리정보얻기</a>
|<a href="/apis/post/write">블로그작성</a>
`;

app.get('/apis/post/write', async (req, res) => {
  const loc = `https://www.tistory.com/apis/post/write`;

  const title = "Post 연동한 타이틀";
  const content = `본문/////${title}`;
  const tag = 'tag, javascript, 티스토리';

  const postData = {
    'access_token': access_token,
    'output': output,
    'blogName': "a3040",
    'title': title,
    'content': content,
    'visibility': 3, //visibility: 발행상태 (0: 비공개 - 기본값, 1: 보호, 3: 발행)
    'category': '1102530', //  카테고리 · GitBook (tistory.github.io)에서 얻어온 id값
    // 'published':published, published: 발행시간 (TIMESTAMP 이며 미래의 시간을 넣을 경우 예약. 기본값: 현재시간)
    // 'slogan':slogan, slogan: 문자 주소
    'tag': tag,
    // 'acceptComment':acceptComment, acceptComment: 댓글 허용 (0, 1 - 기본값)
    // 'password':password,acceptComment: 댓글 허용 (0, 1 - 기본값)
  }

  let view_html = `${menu}`;

  try {
    const awaitRes = await axios.post(loc, postData);
    console.log(awaitRes.data);

    const dataToString = JSON.stringify(awaitRes.data);
    view_html += `${dataToString}`;
  } catch (error) { console.error(error); }

  res.send(`${view_html}`);
});
실행화면 입니다. code획득 > access_token을 얻은 후에 나머지 작업들이 가능합니다. "블로그작성" 클릭

"블로그작성" 클릭 후 상황입니다.

api가이드에 나와었었던 것처럼 등록된 블로그 uri가 반환됩니다. 반환된 uri로 접속해봅니다.

방금 작성한 블로그가 잘 보입니다. 파라미터 매핑도 정확하게 되어있습니다.
이상으로 node에서 express를이용해서 tistory open api 사용에 대해서 마치도록 하겠습니다. python으로 되어 있는 예제가 많아서 javascript로 한번 작성해 보았습니다.
전체코드는 tistory_openapi/ex4 at master · a3040/tistory_openapi · GitHub를 참조하세요.
'사용해보기 > express를 이용한 tistory open api 연동' 카테고리의 다른 글
| tistory openapi를 이용한 get 방식 연동 (0) | 2023.05.10 |
|---|---|
| code로 Access Token 발급받기 (0) | 2023.05.09 |
| 인증 요청 및 Authentication code 발급 (0) | 2023.05.08 |
| tistory 연동을 위한 준비사항입니다. (0) | 2023.05.08 |


